


Basic Information[]
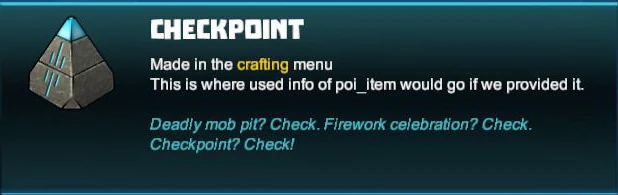
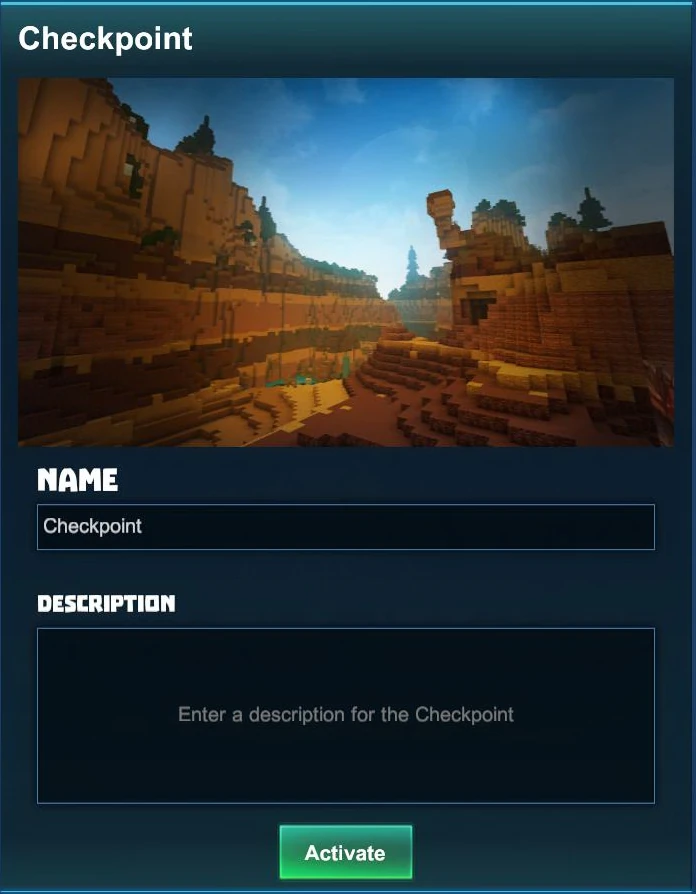
The Checkpoint is a crafted item that is intended to be used in Adventures.
Since Adventures require at least one Checkpoint to be placed, most Adventures combine this Checkpoint with a certain gameplay goal that needs to be accomplished.
Intermediate or additional targets can be defined by placing more Checkpoints (either to be "checked" in a certain order or in no particular order, which is up to the Adventure creator to define).
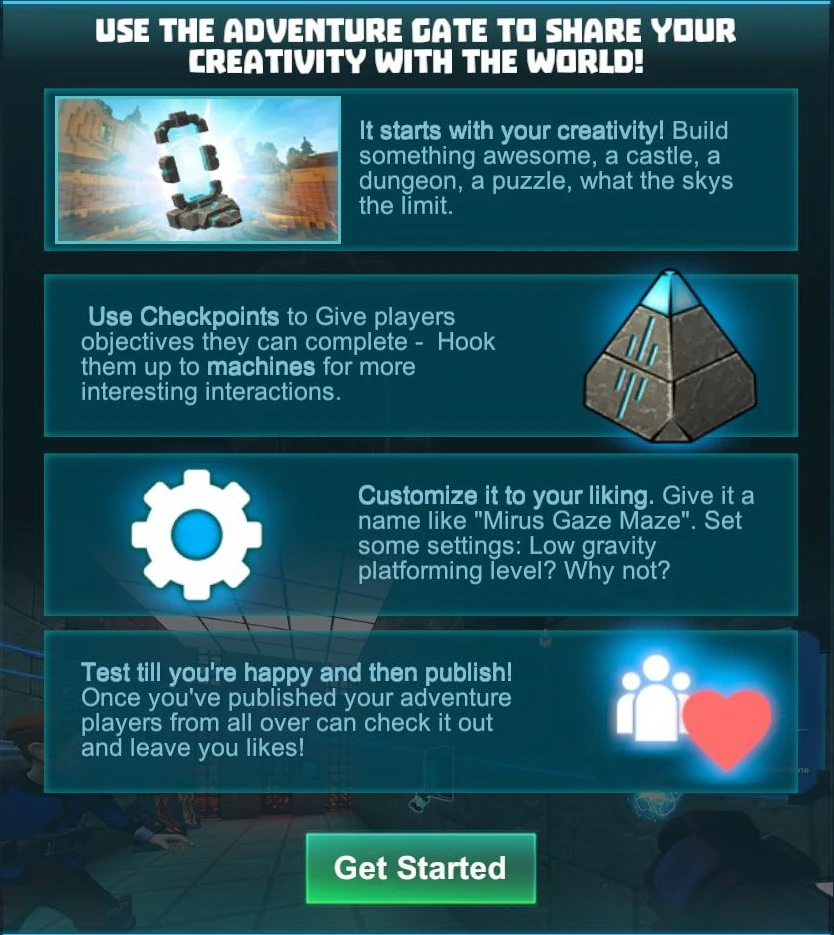
Checkpoints are often used to mark locations (Points of Interest or POIs) or to provide objectives that need to be completed.
Checkpoints in an Adventure will also show as a marker on the compass on top of the screen, so they can help point players in the right direction to their next objective or location.
Checkpoints have blue patterns that are slightly visible in the dark, but will light up significantly when being activated. Upon activation, Checkpoints will make a sound that is similar to a flask being uncorked.
How to obtain[]
These objects cannot be obtained from any Creatures nor from any common randomly spawning Treasure Chests.
Checkpoints can be crafted in your Crafting Menu (to be opened by typing "Q" as the default key), but only after the according crafting recipe has been unlocked for free.
How to unlock the crafting recipe[]
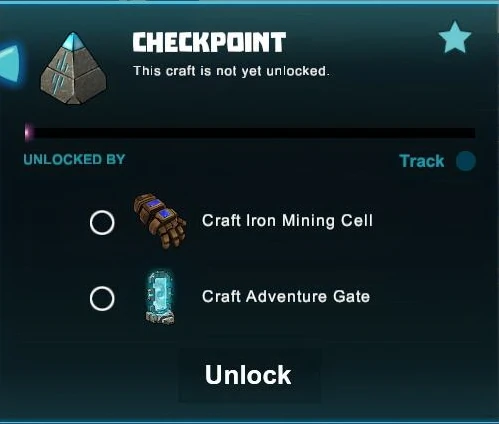
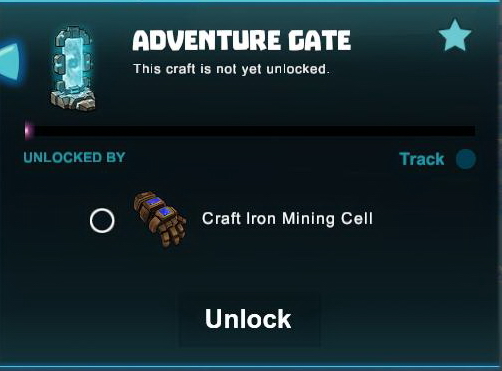
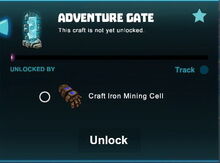
In order to unlock the crafting recipe for Checkpoints in your crafting menu, you will first need to craft or obtain:
- an Iron Mining Cell and
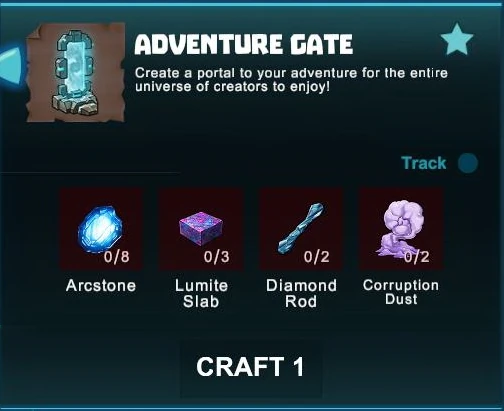
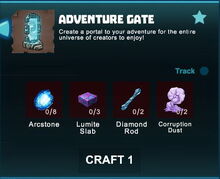
- an Adventure Gate
How to craft[]
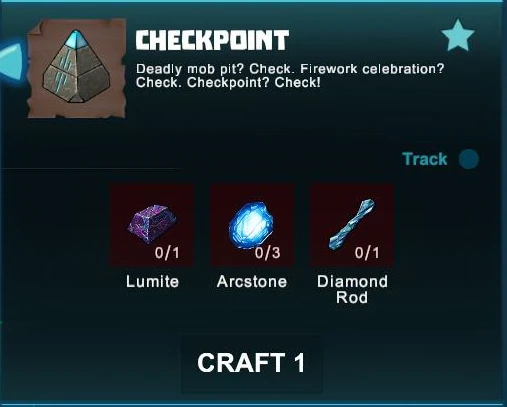
To craft one Checkpoint, you'll need:
- 1 Lumite bar made in a Forge from Lumite Ore that can be extracted from Lumite Nodes on the Corruption layer deep underground
- 3 Arcstones obtainable from Keepas of any kind either as loot or pet-harvest
- 1 Diamond Rod made of a Diamond (bar) in a Processor. Diamond Ore can be exteracted from Diamond Nodes on the Lava layer deep underground. Diamond Nodes can be created from Coal Nodes alternatively
How to use[]
First, Checkpoints have to be placed into the game world - preferably at least one of these should be placed at the end point of your Adventure area where you'd like players to exit your Adventure.
You can optionally add more Checkpoints along the way. You can also wire up Checkpoints with Sensors so that the Checkpoints will be activated automatically when a player reaches a certain point of your Adventure
Then activate your Checkpoints by clicking your right mouse button or typing "f" as the default key while looking at them with your cursor, to name them or rename them properly.
The names of all placed Checkpoints will show up in a list when configuring the Adventure, but also within the Adventure for the players who are playing it - so if you should decide to use different Checkpoints, you might want to choose their names wisely.
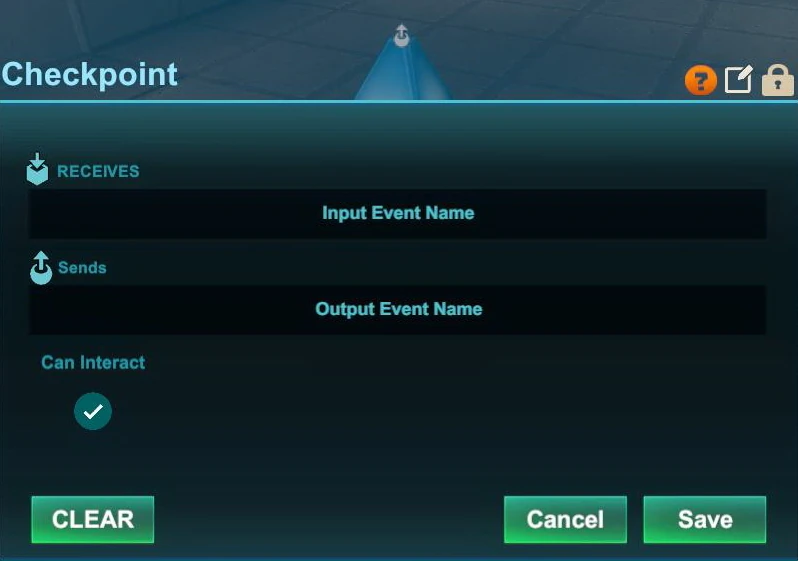
You can rename Checkpoints like most other wireable objects by inspecting them and then clicking on the icon that looks like a square note with a "pen" on it in the top right corner. To inspect them, equip an Wiring Tool and type "n" (as the default key) while pointing your cursor at a Checkpoint that has been placed into the game world.
You can then type up to 30 characters into the labelling array of each Checkpoint and confirm this with "enter"/"return". This name/label will then be displayed instead of "Checkpoint" when pointing the cursor at it. Picking it up will reset the name of the Checkpoint to the default again though.
Then you'll need to craft an Adventure Gate (or you will probably already have done that to unlock the crafting recipe for Checkpoints) and place the Adventure Gate at the starting point of your Adventure.
Activate your Adventure Gate by right-click or typing "f" (as the default key). Then configure your Adventure there.
In your Adventure Gate window, you can now define which Checkpoints have to be activated in order to complete the Adventure (enable the checkboxes of the according checkpoints that will be listed in the Adventure Gate window).
There's also an option in the Adventure Gate window that you can enable if you want players to activate the Checkpoints that you have placed in a specific order as a requirement to complete the Adventure.
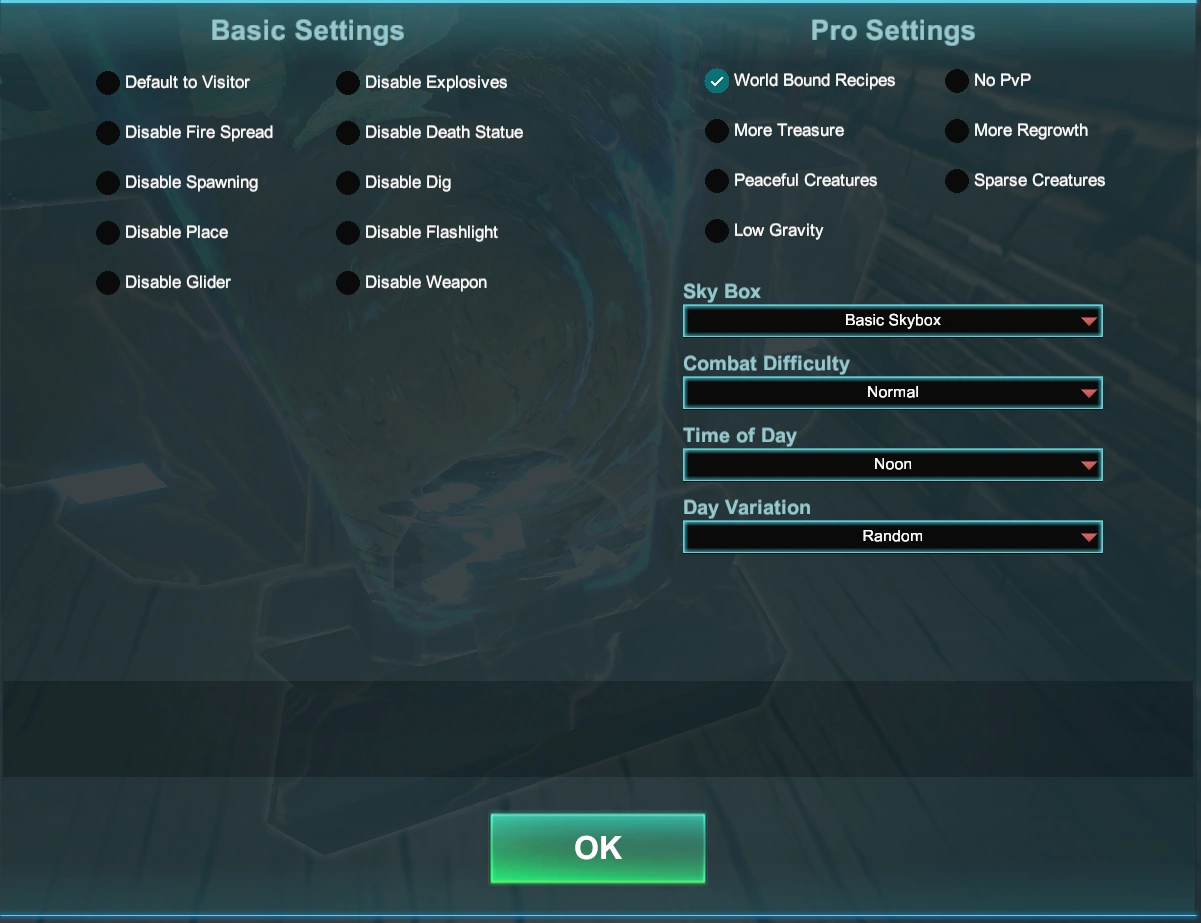
Please note that Claims with certain option settings currently can interfer with the options that you want to set for your Adventure!
Wiring Checkpoints[]
| Checkpoints can be wired to activation devices like Switches, Number Pads, Sensors or Pressure Plates etc. and to activatable wireable objects like doors, wicket gates, lamps, beacons, fans, block phasers, mob spawners, loot spawners, LEDs, campfires, fire pits, trap doors, corrupt obelisks, snow blowers, chimneys, etc. Lptionally operating gates can be wired in between, like Logic Gates, Flip-Flop Gates, Delay Gates, Inverter Gates and/or Number Comparison Gates. |
Checkpoints can be activated by various methods (e.g. by pressing "F" as the default key as long as the "can interact" option is not disabled), walking over a Pressure Plate that is wired to a Checkpoint, activating a Switch or Sensor that is wired to a Checkpoint), all in order to advance other players through the adventure.
Checkpoints can also output a signal upon activation. This can be used to trigger events when a checkpoint is reached, for example to activate a Block Phaser that will either open or seal a passage and or to provide a reward that will spawn by wiring a Loot Spawner to the Checkpoint, or activating an Arc Sign to aid story telling when the Checkpoint has been reached, etc.
To wire Checkpoints, equip an Wiring Tool and point your cursor at the Checkpoints that you have placed into the world. Their "Receive" Hotspot will become visible then and you will be able to connect them to the "Send" Hotspot of activation devices and/or of operating gates. Also wire their "Send" Hotspot to an activation device like Logic Gates, Flip-Flop Gates, Delay Gates, Inverter Gates and/or Number Comparison Gates.
Type "n" (as the default key) to inspect the wiring window of the Checkpoints if you wish to type a code word into the receiving array that you should then also use in the sending array of the activation device/s to connect them.
You can fully rotate Checkpoints into all directions by pointing your cursor at them, then pressing and holding R (as the default key) and then moving the mouse while holding down the left mouse button. The chosen rotation angle can be "locked" too by simply typing "r" while looking at an already rotated item, so that all items of the same stack in the chosen quickslot will then face the same direction when being placed.
Checkpoints can be picked up without the need to equip any Power Cells if you match or outrank the permission level of the gate that has been defined by its owner. Of course you won't be able to pick up such objects on game worlds, on player claims or in Adventures where your Permission rank is not sufficient (mainly when you are merely a visitor), which can only be changed by the owner of the game world, the respective claim owner or Adventure creator.
How to change the settings of Checkpoints[]
The interactivity of Checkpoints can be toggled as well. Wireable objects like Checkpoints can be activated/deactivated by players of all permission ranks, even by visitors, unless their interactivity is disabled for all players with an Wiring Tool.
For this purpose you can lock your Checkpoints by disabling the option "can interact". You can access this option when looking at the Checkpoints with an Wiring Tool equipped and typing "n" (as the default key) to open the inspection window.
When disabling the option "can interact", other players cannot switch your Checkpoints on or off, but only if their permission rank is lower than the minimum permission level of the according Checkpoint. If players are either builders or even admins on your player claim or on the game world (if the Checkpoints are not placed on any claimed land), then these players might not only activate/deactivate your Checkpoints, but even pick them up and take them away.
The padlock symbol lets you define the minimum permission rank for your Checkpoints that players will need to match or outrank in order to be able to see and change the settings of Checkpoints with their own Wiring Tool. Equip an Wiring Tool and type "n" (as the default key) to open the wiring window of the Checkpoints. Look for the padlock symbol in the top right corner of the settings window.
Click on this padlock icon to check the permission setting that is currently selected. The permission level of these Checkpoints will be set to "world builders" by default when placing the Checkpoints, and on player claims the permission will automatically be set to "claim builders" when the Checkpoints are placed.
When raising the permission level of Checkpoints with the padlock symbol, only their owner as well as players with a matching or even higher permission rank than the permission level of these Checkpoints can use their Wiring Tool to change the settings (including "can interact") of the Checkpoints, so that they can switch the Checkpoints on/off directly, or even take them.
Showing Checkpoints on the Map[]
The option to display checkpoints on your map (to be opened by pressing "m" as the default key) is for Adventures only, they cannot be used as markers for all kinds of POIs on your usual ingame map.